Showing posts with label Cloud. Show all posts

Thursday, May 23, 2019

Cloud Native way of security


How to secure cloud in cloud native era

Introduction
When it comes to cloud security there are approaches that rely on same tools that worked for on premise infrastructure. Those approaches are commonly referred as on premise security posture. We are seeing that more companies are making cloud native applications. For cloud security, there is a need to have a shift from on premise security posture to a cloud native approach to security. We need to take an approach that relies more on native cloud primitives offered by the cloud provider.

Cloud native way of security
Cloud infrastructure has become the de facto infrastructure for hosting applications and workloads that enable a business to provide value. Cloud has proved to be a value multiplier and more and more businesses are trying to tap into the cloud value. In terms of the applications, companies are shifting to cloud native approach for application architecture. This shift towards cloud native applications is the right approach as this helps companies realize the cloud value. The cloud native way of security is taking the cloud native approach for the applications and applying it for cloud security. For example, the cloud native application is architected to use cloud platform as a resource and not just a hosting environment, similarly cloud native security is tapping into cloud platform for providing security posture.
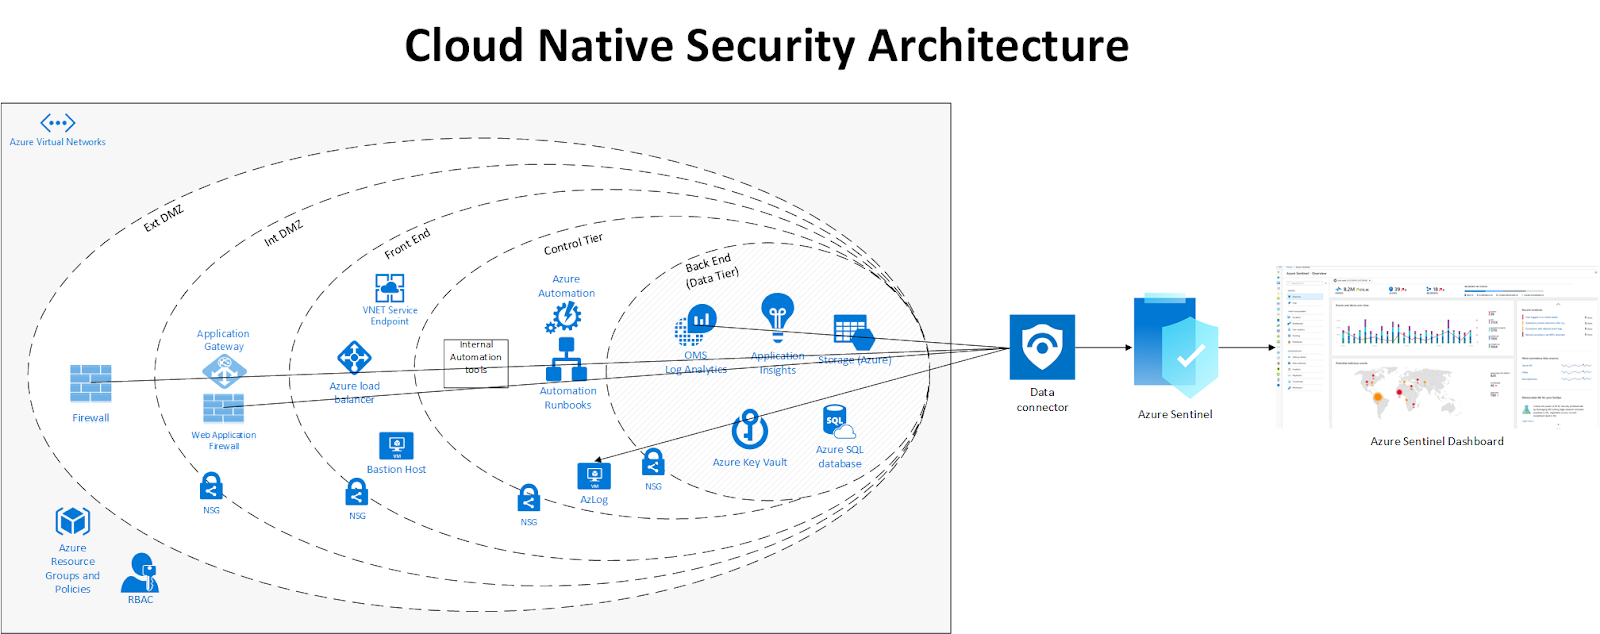
Note: The left side of the cloud native security shots the conceptual view of security in depth. The implementation architecture might show each layer as a separate entity at the same level.

Why we need Cloud native way of security
It is all about the understanding and the approach that is the result of the understanding. There are two mindsets when it comes to cloud security. One mindset is about looking at what has worked at on premise data center and replicating it to cloud. The other mindset is looking at cloud as a platform for resources that provides components for cloud security. The on premise mindset typically involves looking the resources as virtual machines that are part of a network and are joined to a domain. The security tools that have evolved over the years for on premise resources essentially addresses the same scheme. These security tools involve (and not limited to):

  •       Relying on host operating systems to provide security by managing and restricting incoming and outgoing traffic flow to/from ports. A good example is a windows firewall. 
  •       Recording all the traffic that is flowing in and out of the network and then analyzing the traffic to flag any suspicious traffic flow. This also give us idea that security actions are typically thought of as reactive action and not proactive actions.
The above two points are just the two examples of security tools that are employed by on premise approach. The intention here is to point out the mindset where security is delegated to tools and not built in the resources/workloads that are part of an on premise establishment.
The reason that those tools were designed that way was because the cloud providers did not offered alternatives to support the cloud native mindset. If we go back a couple of years ago and image that we had to host a cloud native application, we still had to rely on the tools that worked before.
Now the time has changed. The cloud providers have addressed the lack of security tools as part of the cloud infrastructure. We have entered an era where native cloud security tools or cloud primitive tools have evolved to fully support the cloud native security. The need is to create cloud based solution architectures that leverage the cloud primitive security capabilities. For example:
·       Instead of relying on windows firewall, NSG (in case of Azure) should be employed. That will also mean to evolve the network architectures that designed for clouds to support that. 
·       Instead of using security tools that record all the traffic, tools like Azure Sentinel should be employed.


Case for Cloud native way of security
Shift-Left Security: With the cloud native way of security approach there will be more push towards achieving security using the shift-left approach. This means that instead of security being addressed something as wrapper, it will be addressed as a feature that is "baked in" into the architecture from the beginning. That is the very definition of the Shift-Left approach.
Security by platform: As more and more systems are being automated and moved to cloud, more and more threats are emerging. The threats are becoming multidimensional in nature. The cloud-native way of security is better equipped to cope with the present and emergent threats.
Defense in Depth: Cloud native way of security allows multiple mitigations applied against threats. If we replace the cloud native way of security with on premise way of security, then we would need to have multiple layers of security that we have to stand up and maintain either by ourselves or the vendors.
Scale: Cloud native way of security is platform based, so it inherently scales within the platform. To understand this, imagine we are back in 2000s. The data that was being generated at that time was not much in scale what we have now. For that time the on premise infrastructure was provisioned to cater the needs of that footprint of data. Now we are in an era of “big data” and to support the scale requirement for that enormous amount of data, we would need more dedicated resources.
Focus on business value: With Cloud native way of security, the focus of business is shifted from security and business to only business. This also means that the computing base that a business is responsible for has been reduce. This makes the systems more secure as there is less computing base that a business needs to protect.
Containerization (aka Kubernetes) revolution: With the advent of containerization more and more applications have shifted towards cloud native architecture. This shift means that the classical cloud security model needs a shift as well towards cloud native way of security.


Example Components of Cloud Native Security Architecture
Azure Sentinel
Each cloud provider has developed its own set of tools that can be defined in the realm of cloud native way of security. From Azure’s side, the tool that implements the cloud native way of security is “Azure Sentinel”. Azure Sentinel is a cloud-native SEIM that leverages AI for threat protection. The way Azure Sentinel works is that it uses Data Connectors. The Data Connectors hook into various Azure services such as Firewall. The Data Connectors then feed in data to Azure Sentinel. Azure Sentinel runs the security related tasks and then shows the security landscape onto a dashboard. More information on Azure Sentinel can be found here.

DDoS Protection
This is a platform level service that Azure offers. As mentioned earlier, the cloud providers are now answering to the call of providing cloud native security tools. Azure DDoS is one of the newer service that helps against the DDoS targeting cloud resources.

Firewalls
Firewalls is an Azure service that helps protect the virtual networks. Since it is a managed service offering there are advantages that come with it. These advantages include real time analysis of traffic and then feeding in the data to Azure Sentinel.

Web Application Firewall
For the applications that are hosted on Azure App services, the web application firewall is essential for it security. For a truly cloud native application that is hosted on App service, just adding the Web Application Firewall will make it cloud native for security.

Azure NSG
NSG is a primitive (native) service offering that helps us implement traffic rules for incoming and outgoing traffic. The beauty of NSG is that it acts like windows firewall but can be applied to various resources such as subnet. In case of subnet if NSG is added then the NSG rules will be enforced on all the VMs and other resources that are part of that particular subnet.

Conclusion
In this article we have looked at the two approaches to cloud security. As we have seen from the tools and the conceptual architecture there are Managed Services that are offered by the cloud providers. Using Managed Services for cloud security infrastructure is the step in the right direction to achieve cloud-native security.

Sunday, April 21, 2019

Developing Containerized Entity Framework Core app on Mac using Docker hub


Introduction

In my last blogpost I walked through the process of simple API app using dotnet core on Mac using Visual Studio Code and Docker hub. In this blog post, I am going to take that app further and enhance it with Entity Framework Core to provide database support. Before we move on to create such app, I wanted to talk about why it makes sense to have an app on Mac using docker hub. There are few advantages that such architecture offers. One is that is going to be a Linux based which means that we can deploy it on most of the cloud infrastructures and plus it is going to cost less. A typical Linux instance with comparable memory and processing speeds costs less than a windows instance. The other advantage is that since we are making this a container, we can use this on any container orchestration platforms such as Kubernetes or Apache Mesos.  In summary developing this application we get the following benefits:
1.     Containerization
2.     Linux based
3.     Developed on Mac (Although you can develop this on Linux machine as well)
4.     Database persistence using  a light weight database
5.     Leveraging ASPNet Core and EF Core technologies.

A public repository has been created which contains all the code for this blog post. The code used in this blog post can be found at: https://github.com/mnabeel/mac-api

Prerequisites

Visual Studio Code
.NET Core SDK
Docker
SQLite
Postman for testing (Optional)


Before starting off on implementing the solution, let us take a look at what we are building.

Goal:

Create a containerized API app that allows adding of Member information in database. The API app will allow also to update and delete member information from the database.

Plan

I have divided the development of this application in five parts.
1.     Create Entity Framework Core app using Visual Studio code
2.     Create Dockerfile that will support the application
3.     Create docker image and push to docker hub
4.     Create docker container by pulling docker image from docker hub
5.     Test the application

You can download the code from the github repository which will allow you to skip directly to Part 2.

Part 1: Create Entity Framework Core app using Visual Studio code


Step 1: Creating simple API app

Note: If you are continuing on the app that was created in the previous blog post then you can skip Step 1. Also, you can download the code directly from github repository at: https://github.com/mnabeel/mac-api

Creating application folder

Open terminal
Run following commands
“mkdir mac-api”
“cd mac-api”

Create API application

On the same terminal where application folder was created, run the following two commands:

1.  “dotnet new webapi”: This will create a new dotnet core app on your application folder (mac-api). Here is the output of running this command:
The template "ASP.NET Core Web API" was created successfully.

Processing post-creation actions...
Running 'dotnet restore' on /Users/XXXX/aspnetcore/mac-api/mac-api.csproj...
  Restoring packages for /Users/XXXX/aspnetcore/mac-api/mac-api.csproj...
  Generating MSBuild file /Users/muhammadnabeel/aspnetcore/mac-api/obj/mac-api.csproj.nuget.g.props.
  Generating MSBuild file /Users/XXXXXX/aspnetcore/mac-api/obj/mac-api.csproj.nuget.g.targets.
  Restore completed in 2.22 sec for /Users/XXXX/aspnetcore/mac-api/mac-api.csproj.

Restore succeeded.

2.  “dotnet restore”: This command will restore the dependencies and tools of a project. Here is the output of this command:

Restore completed in 58.86 ms for /Users/muhammadnabeel/aspnetcore/mac-api/mac-api.csproj.

Editing the application
Once application has been created, switch to Visual Studio Code to edit the project.
1.  Open Visual Studio Code.
2.  Open the application folder “mac-api”
3.  Modify Startup.cs to remove code related to HTTPS redirecting. After the modification your Startup.cs code should look like the following:

4.  using Microsoft.AspNetCore.Builder;
5.  using Microsoft.AspNetCore.Hosting;
6.  using Microsoft.AspNetCore.Mvc;
7.  using Microsoft.Extensions.Configuration;
8.  using Microsoft.Extensions.DependencyInjection;
9.   
10. namespace mac_api
11. {
12.     public class Startup
13.     {
14.         public Startup(IConfiguration configuration)
15.         {
16.             Configuration = configuration;
17.         }
18.  
19.         public IConfiguration Configuration { get; }
20.  
21.         // This method gets called by the runtime. Use this method to add services to the container.
22.         public void ConfigureServices(IServiceCollection services)
23.         {
24.             services.AddMvc().SetCompatibilityVersion(CompatibilityVersion.Version_2_1);
25.         }
26.  
27.         // This method gets called by the runtime. Use this method to configure the HTTP request pipeline.
28.         public void Configure(IApplicationBuilder app, IHostingEnvironment env)
29.         {
30.             if (env.IsDevelopment())
31.             {
32.                 app.UseDeveloperExceptionPage();
33.             }
34.             app.UseMvc();
35.         }
36.     }
37. }


You can run the current app to verify that it runs and changes to Startup.cs were correct. Before running the app, we need to make sure that port that we are going to use is not used by any other application. For that we will take a look at file called “launchSettings.json” which is present in the “Properties” folder as shown below:


I already had port 5001 and 5000 being used by another application so I changed the ports on line 24 to be ports 7001 and 7000 as shown above.

Run the following command from your terminal:
“dotnet run”
Here is the output of the above command:
Using launch settings from /Users/XXXX/aspnetcore/mac-api/Properties/launchSettings.json...
info: Microsoft.AspNetCore.DataProtection.KeyManagement.XmlKeyManager[0]
      User profile is available. Using '/Users/muhammadnabeel/.aspnet/DataProtection-Keys' as key repository; keys will not be encrypted at rest.
Hosting environment: Development
Content root path: /Users/XXXX/aspnetcore/mac-api
Now listening on: https://localhost:7001
Now listening on: http://localhost:7000
Application started. Press Ctrl+C to shut down.

Now we can open the browser and browse the http://localhost:7000/api/values and see the following output:

We have created our application using dotnet core sdk on a Mac. We can now move on to the next step of adding Entity Framework Core support and creating the MembersController.


Step 2: Creating MembersController with EF Core support that allows CRUD functions

For this step, we are going to take following actions:


Adding support for NuGet Package Manager

In order for us to use Entity Framework Core, we need to ensure NuGet Package Manager is installed on Visual Studio Code. Install the NuGet Package Manager by clicking the “Extensions” button on the left panel of Visual Studio Code and enter “Package Manger” in the search bar. This will list the NuGet Package Manager that you can install as shown below:


Adding support for Entity Framework Core
Once the NuGet Package Manager is installed, you can use the command palette as shown below:


Following two packages should be installed for this step.
1.  Microsoft.EntityFrameworkCore
2.  Microsoft.EntityFrameworkCore.Sqlite

Note: Since our Mac-Api app is using dotnetcore version 2.1, we need to make sure that Entity Framework Core matches the version. In our case both packages had the compatible version of 2.1.1.
Once both packages are added the mac-api.csproj file would look like below:


Add Model

Create a folder calls models in Visual Studio Code and add a file called Member.cs as shown below:


Add EFCore Context

Create a folder called ‘Data’. This folder will house our MemberContext.cs file that will provide the connection between our Members API controller and database. Add the MemberContext.cs to Data folder with code as shown below:

Adding SQLite database file

For our application we are going to use a lightweight database called SQLite. This will be the database that we will use in our container as well. In order to create the database file (MacApiMembers.db), we will switch to terminal and completing the following steps:
a.     First, we verify that we have SQLite installed. On your terminal window run the following command:
“sqlite3 –version”
The output of  this command will be like shown below:


b.     Create MacApiMembers.db
To create the database file run the following command:
“sqlite3 MacApiMembers.db”
Just running this command will not result in the MacApiMembers.db file. We also need to create table. When we run the “sqlite3 MacApiMembers.db”, we are presented with sqlite prompt. That is where we  will execute the following command to create Member table as shown below:
“create table Member(Id smallint, Name varchar(50));
This command will be entered in the sqlite> prompt.
Once the above command is run, the MacApiMember.db file is added as shown in the following screenshot of the Visual Studio Code:


Adding code for MembersController.cs

Up till now we have ensured that all the dependencies that we need for MembersController.cs are in place before we code the MembersController.cs. Now we can go ahead and jump right in. Add a new file to the “Controllers” folder and call it “MembersController.cs” file. This will contain our code that will carry out the goal of executing the CRUD operations. Here is the code for the “MembersController.cs”.

using System;
using System.Collections.Generic;
using System.Linq;
using Microsoft.AspNetCore.Mvc;
using MacApi.Models;
using MacApi.Data;

namespace MacApi.Controllers
{
    [Route("api/[controller]")]
    [ApiController]
    public class MembersController : ControllerBase
    {
        private readonly MemberContext membersContext;

        public MembersController(MemberContext context) {
            membersContext = context;
        }
        public List<Member> Members = new List<Member>();

        // GET api/members
        [HttpGet]
        public ActionResult<IEnumerable<Member>> Get() {
            var members = membersContext.Member.ToList();
            // Members.Add(new Member() {
            //     Id = 1,
            //     Name = "MemberName"
            // });
            return members;
        }

        // GET api/members/5
        [HttpGet("{id}")]
        public ActionResult<Member> Get(int id)
        {
            var member = membersContext.Member.FirstOrDefault(m => m.Id == id);
            return member;
        }

        // POST api/members
        [HttpPost]
        public void Post([FromBody] Member member)
        {
            membersContext.Member.Add(member);
            membersContext.SaveChanges();
        }

        // PUT api/members/5
        [HttpPut("{id}")]
        public void Put(int id, [FromBody] string value)
        {
            var member = membersContext.Member.FirstOrDefault(m => m.Id == id);
            if(member == null) {
                throw new Exception("Provided member id not found");
            }
            member.Name = value;
            membersContext.SaveChanges();
        }

        // DELETE api/members/5
        [HttpDelete("{id}")]
        public void Delete(int id)
        {
            var member = membersContext.Member.FirstOrDefault(m => m.Id == id);
            if(member == null) {
                throw new Exception("Provided member id not found");
            }
            membersContext.Member.Remove(member);
            membersContext.SaveChanges();
        }
    }
}


The code is pretty self-explanatory. We are just using HTTP verbs to add, update and delete member information.

Once the coding part is done, you can go ahead and run the application to make sure everything runs okay.

Since we are using Visual Studio code, I found it very helpful to just use the debugger that comes with Visual Studio Code. The tool that I use to test any API application is Postman.
Here is the screenshot that shows executing the get action to display all the members:


Here is the screen shot that shows how a new member information is added using the post method:


This concludes the end of part 1. We can now move to next part.

Part 2: Create Dockerfile that will support the application

Create a “Dockerfile”. If you are continuing from previous post, then the “Dockerfile” should already be there. In that case ensure that it shows the following content:

FROM microsoft/dotnet:2.1-sdk as build
WORKDIR /app

# Copy csproj and restore as distinct layer
COPY *.csproj ./
RUN dotnet restore

# Copy SQLite database file
COPY *.db ./

# Copy everything else and build
COPY . ./
RUN dotnet publish -c Release -o out

# Build runtime image
FROM microsoft/dotnet:2.1-aspnetcore-runtime as runtime
WORKDIR /app

COPY --from=build /app/out .
# Install SQLite
RUN apt-get -y update
RUN apt-get -y upgrade
RUN  apt-get install -y sqlite3 libsqlite3-dev
RUN sqlite3 MacApiMembers.db  "create table Member (Id smallint, Name varchar(50));"

ENTRYPOINT ["dotnet", "mac-api.dll"]


Let us talk a little about the “Dockerfile” mentioned above.  Most of the code written above for “Dockerfie” is pretty straight forward, we are copying the contents of our application in build and then creating a runtime image. In the runtime image, there is a section that is related to SQLite. Since we are embedding the database with the application, it is important to add SQLite command in the “Dockerfile” so when the container is created, it would have all the dependencies. There is one command in particular that I want to draw your attention to. The command is mentioned like:
RUN sqlite3 MacApiMembers.db  "create table Member (Id smallint, Name varchar(50));"

The above command is creating the table in the MacApiMembers.db. This is part of the setup for the application. This command is added so that we can make sure that table is created before the application is launched. This way the application will run without making adjustments to the tables.

Part 3: Create docker image and push to docker hub


In the previous part we created the “Dockerfile” that is necessary to create the container. In this part we will create the docker image and push it to docker hub.

In order to build docker image for our “mac-api” application, run the following command
“docker build -t mac-api .”

Again, make sure mac-api is replaced with the application name that is being used.


Running the above command will take some time as it will download all the dependencies. Once done, following output is received:


To verify that you have created a docker image for your app, run the following command:

“docker images”


Running the above command yields the following output:


 Now we have the docker image that we can push to docker hub. This is a three-step process

1.     Login
Run “
docker login” command on your terminal

2.     Create image tag
Run “
docker tag mac-api [[YourDockerHubUserId]]/mac-api”

3.     Push image to docker hub
Run “
docker push [[YourDockerHubUserId]]/mac-api”               

This step concludes the part 3. In the next part we will create the docker container by pulling the docker image that we just pushed to docker hub.


Part 4: Create docker container by pulling docker image from docker hub


On terminal, type the following command:
“docker run --name mac-api-remote --env ASPNETCORE_ENVIRONMENT=Development -p 80:80 [[YourDockerHubId]]/mac-api:latest”


What is happening in this command? We are using the run command that is going to create a docker container. For the name, we have given mac-api-remote just to indicate that the image for this container is being pulled from docker hub, but any name can be used here. -p is telling us what port we are going to bind the container with.  The last is the address to our docker image.


When we run the above command, we get the following output instructing us to browse the site using http://localhost/api/values. In order to see the members, we will navigate to http://localhost/api/members.

To thoroughly test the application, we will need to use Postman. In the next and final part, we will talk about using Postman for carrying out the testing.

Part 5: Testing

If you look at the MembersController.cs, you can see we have five actions that are for:
1.     Getting all the members(HttpGet)
2.     Getting a particular member (HttpGet),
3.     Posting a new member (HttpPost)
4.     Updating a particular member (HttpPut)
5.     Deleting a particular member (HttpDelete).

Let us test these one by one using Postman.

Testing getting all members:


Testing getting record for a particular member


Testing adding a new member


Testing updating a particular member


Testing deleting a particular member


Let call the get all members again to see what has been updated and deleted. Following screenshot shows the result:


As you can see from the above result, we were able to update the member 3 with name field as “ThirdMember” and member 2 is not present because it was deleted.

That concludes the final part of testing the application.

Conclusion

In this blog post, we have created and tested a containerized dotnet core app that using Entity Framework Core to manipulate a SQLite database. This blog post has shown that in order to develop a robust dotnet core app, we can use a Mac with results as good as developing similar application on windows PC. This also shows that using free tools, like Visual Studio Code, Postman and docker we can create production grade application with no cost on development tools. With this post, I hope users will be able to use dotnet core apps more and leverage the free tools that are available. Please provide any comments or feedback. Your feedback will definitely help this post and next posts in future.