Sunday, November 25, 2018

Leveraging Built-in endpoints in Azure IoT Hub

Introduction


One of the great features of IoT hub is its built-in systems endpoints. This allows us to quickly hook into event hub belonging to an IoT hub without the need to an EventHub, Azure Storage containers, Service Bus queues and Service Bus topics.

In this post, we are going to look into how to easily we can leverage the built-in endpoints in Azure IoT hub by creating a simple application using Azure Functions.

When you have an Azure IoT hub and want to hook into events generated by Azure IoT hub, you have two main choices.

1. Events provided as part of Azure Event Grid
Using Azure Event Grid we can use resources such as Logic Apps, Azure Functions, Web Hook, Storage Queues, Event Hubs, and Hybrid Connections.

2. Built-in endpoints

This is the built in endpoint that every Azure IoT hub offers as part of its infrastructure. Using Built-in endpoints we can hook into system and device messages. So when a device sends a message to Azure IoT hub, this "Built-in endpoints" to receive those messages.

Figure 1 - Built-in endpoints view

Using Built-in endpoints

To use built-in endpoints, we will create a custom Azure functions that uses the built-in endpoint to listen to messages emitted by the device to Azure IoT hub. We will  use the following steps to accomplish that.

Step 1- Get Event Hub-compatible endpoint

  1. Open the Azure portal and navigate to Azure IoT hub. 
  2. Click "Built-in endpoints" in the navigation pane. This will show a view that is similar to view show in Figure 1.
  3. Copy "Event Hub-compatible endpoint" and save it to be used in the Azure Function app that is mentioned in Step 2.

Step 2 - Creating Azure Function App

1. Using the boiler plate project that is created when Azure Function App is selected, we can modify the code  as shown below.
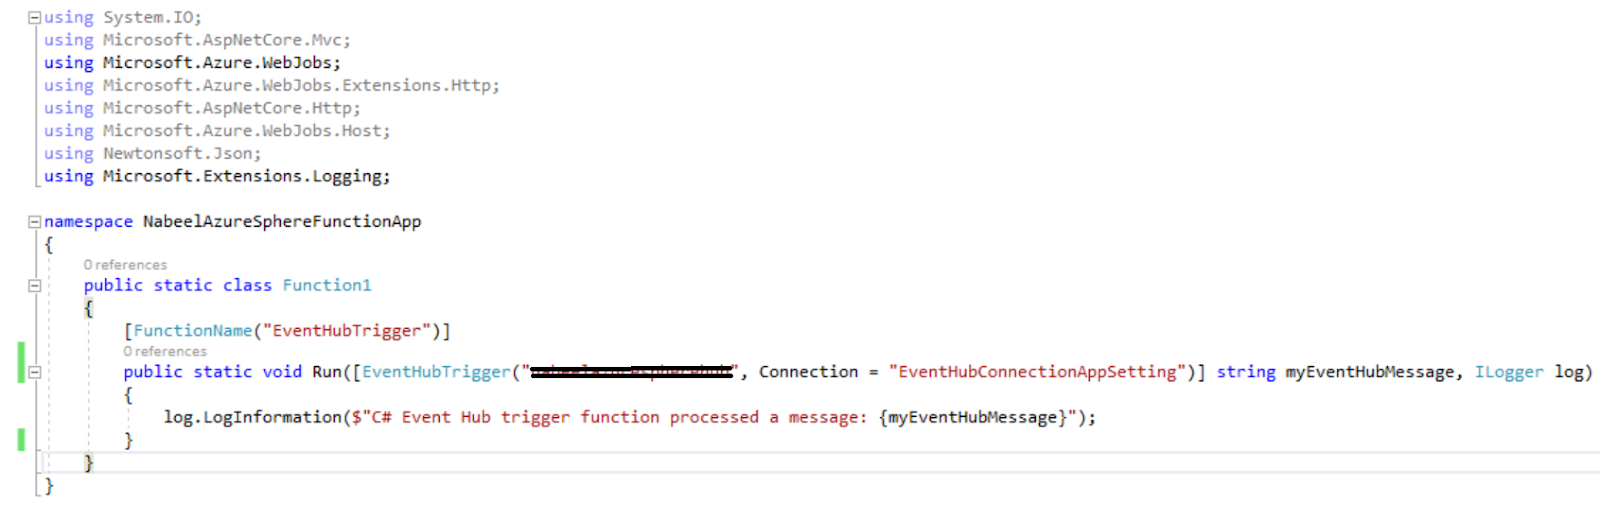
Figure 2 - Azure function code

2. Update connection string:
Using the connection string saved in Step 1, update the local.settings.json as shown below:
Figure 3 - Event hub connection string using Built-in endpoint


3. Managing dependencies:
In order to use the Event Hub triggers, we have to add the following NuGet packages:
Figure 4 - Dependencies


Conclusion

We have seen how easy it is to use Built-in endpoints to hook into  Azure IoT hub events. Although we have used Azure Functions app to demonstrate the application that is listening to Azure IoT events using Built-In endpoints, we can use any application platform that can be invoked using EventHubTrigger.

Thursday, November 1, 2018

Getting started with Azure Sphere

Azure Sphere - MT 3620 on my work desk


Note: This is first of a series of blog posts that are related to my work done on Azure Sphere. Stay tuned for more on Azure Sphere.

Introduction

One of the best to learn a new technology is to just get hands dirty start work on the new technology. In this blog,  I will take you through the steps that I carried out in order to start work on Azure Sphere.

Once you have received the Azure Sphere device, it's time to get started. Here is the link https://azure.microsoft.com/en-us/services/azure-sphere/get-started/that will take you through the steps of acquiring a Azure Sphere device.

1. The very step is to attached the device with your development machine. If you have the correct operating system then the device manager should automatically install the drivers. In my case the drivers for the device did not install automatically so I had to go to a special page that allowed me to download the drivers. Visit http://www.ftdichip.com/Drivers/VCP.htm to download the driver. The following image shows the driver that I downloaded for my development machine:


2. Once you downloaded and install the drivers, your device manager should look like as the following image.


Notice the three USB Serial Ports (in my case I got COM 4, COM 6 and COM 7)


3. Download Install Azure Sphere SDK for Visual Studio Preview.

4. The Azure Sphere SDK for Visual Studio Preview would install the Azure Sphere Developer Command Prompt Preview. This command line utility is your bridge between the Azure Sphere device and your development effort.

5. Run azsphere login command on  "Azure Sphere Developer Command Prompt Preview" to ensure you can Azure Sphere SDK has been properly installed and you can access your subscription.

6. Creating a Tenant
azsphere tenant create --name mytenant

0000000-xxxx-xxxx-xxxxx-xxxxxxxxxx mytenant


7. Claiming the device
azsphere device claim

Claiming device.
Successfully claimed device ID 'XXXXXXXXXXXXXXXXXXXXXXXXXXXXXXXXXXXXXXXXXXXXXXXXXXXXXXXXXXXXXXXXXXXXXXXX' into tenant 'afrinish' with ID '0000000-xxxx-xxxx-xxxxx-xxxxxxxxxx'.
Command completed successfully in 00:00:03.3873192.


8. Configure Wi-Fi

azsphere device wifi add --ssid [[yourSSID]] --key [[yourNetworkKey]]

Running the command would yield the following output.

Add network succeeded:
ID                  : 0
SSID                : XXXXXXXXXX
Configuration state : enabled
Connection state    : unknown
Security state      : psk

Command completed successfully in 00:00:02.0253617.


Conclusion

In this blogpost, we have gone through the steps of getting started with Azure Sphere. We started off by acquiring the device, installing necessary software and drivers, configuring the device and connecting it the Wi-Fi. If there any any issues, please use the comments section to ask questions.

The next step would be to start developing. Happy coding!